Custom Modules - Part 2 - 7 Steps to Building a Custom Module - Background
In this article in the multi-part series on building custom modules for Dynamicweb, you'll learn more about the theory behind Custom Modules in Dynamicweb. You’ll see the considerations you need to make up front, what a system name is, how to structure your project and how to retrieve data associated with the module on a paragraph. In part 3 of this article series you see how to put this theory in practice.
Introduction
To create a bare-bones custom module you need to carry out the following steps:
- Make up a system name for your module.
- Create a new folder under the CustomModules folder in the Visual Studio solution and name it after the system name of your new module.
- Create an ASPX file called SystemName_Edit.aspx where SystemName is the system name of your module.
- Create a front end class that inherits from ContentModule and that is able to render the HTML for the module.
- Override the GetContent method of the ContentModule.
- Apply an AddInName attribute to the class.
- Register the module in the Admin interface of Dynamicweb.
Each of these steps is discussed in detail in the next sections. In the part 3 in this series you see the actual steps carried out in a Visual Studio project. For now, this article focuses on the theory.
System Name Considerations
Custom Modules in Dynamicweb rely on what is called the system name, a short name you give to the module and that is used internally to uniquely identify, register and find your custom module. This name should not contain special characters like spaces and should describe the module you are creating. For example, your news module could have a system name of simply News while your dealer search module could be called DealerSearch. You're free to choose your own name as long as it consists of only letters and numbers. When you register your module in the Admin interface you can also supply a friendly name for the module (like Dealer Search with a space) which is what your users will see. You'll see how to supply this name later. To avoid potential (future) problems with name collisions for modules that Dynamicweb may come up with it’s a good idea to prefix your module with something unique to your project or company, such as an abbreviation or the word Custom. For example, for modules developed for De Vier Koeden, I can choose to prefix the system name with Dvk.
The system name is used at a few different locations: the folder name under the CustomModules folder in the Visual Studio project and in the required SystemName_Edit.aspx page which you’ll see later. Additionally, it's used in the AddInName attribute and in the ModuleSettings and ModuleHeader controls to hook up fields used in the module. You'll see more about this in later sections of this article.
Creating the Module Folder
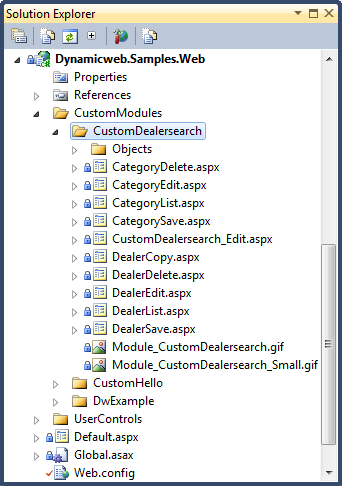
You must create the main folder for your custom module under the CustomModules folder. You also must name the folder after the system name you have chosen for your custom module. Within this folder, you can create your own sub folders to organize the files for your custom module. Figure 1 shows a Solution Explorer for a module called CustomDealerSearch. It has its own Objects folder and has a number of ASPX files that make up the module.

Figure 1
Creating the Module Edit Page
To allow a user to insert your module in your paragraph, you need to supply what is called the Module Edit Page for the module. This page takes the required name of SystemName_Edit.aspx where again SystemName refers to the system name of your module and must be placed directly in the module's main folder (which is named after the module as well).
Your Module Edit Page should at least contain a Dynamicweb ModuleHeader control, a server control that renders a header for the module consistent with the Dynamicweb built-in modules. Additionally, when your module takes user input, you can add other controls, like the Editor or standard ASP.NET controls like the TextBox to accept user input. To group your controls visually, you can use the GroupBox control and wrap your form's content within these controls. Finally, to tell Dynamicweb what data to persist in the database when you save a module you need the ModuleSettings control.
All of these controls are discussed in more detail later in this series.
A very basic Module Edit Page can look like this:
<%@ Register Assembly="Dynamicweb.Controls"
            Namespace="Dynamicweb.Controls" TagPrefix="dw" %>
<dw:ModuleHeader ID="ModuleHeader1" runat="server" ModuleSystemName="CustomNews" />
<dw:ModuleSettings ModuleSystemName="CustomNews" Value="HelloText" runat="server" />
<dw:GroupBox ID="GroupBox1" runat="server" Title="Text">
  <table style="width: 100%;">
  <tr>
    <td style="width: 170px;">Text</td>
    <td><input id="HelloText" class="std" type="text" runat="server"/></td>
  </tr>
  </table>
</dw:GroupBox>
This page is the Edit page for a fictitious News module called CustomNews. The page defines a simple HTML table that contains a single input box whose value is saved with the associated paragraph automatically.
Storing Module Related Data in Dynamicweb
This Edit page contains a single text box that allows a user to enter some text. Obviously, you want DW to persist this value for you when users make changes to that field. Fortunately, this is taken care of automatically.
To see how this works, look at the ModuleSettings control at the top of the page:
<dw:ModuleSettings ModuleSystemName="CustomNews" Value="HelloText" runat="server" />
This ModuleSettings control is used to register the fields that Dynamicweb should save when users save the settings for the module. In this example, CustomNews is the system name of the module. The ModuleSettings control registers the field HelloText through its Value property. This field has a one to one mapping with the input field in the page. Internally, Dynamicweb uses something like Request.Form["FieldName"] to get the data associated with the field.
You can add multiple values in the Value property by separating them with a comma, like this:
<dw:ModuleSettings  ModuleSystemName="CustomNews"
        Value="HelloText,Description" runat="server" />
The Description field could then come from a Dynamicweb Editor control (or any other UI element), like this:
<dw:Editor ID="Description" runat="server" />
With controls like the input field, the Dynamicweb editor and the ModuleSettings control, Dynamicweb is able to store the user data in the selected paragraph for you. It does not, however, restore the selected data. You'll see how to do this in part 4 of this series.
Creating a Front End Class
The Front End class is responsible for outputting the HTML for your module. It should inherit from ContentModule or a class that ultimately inherits ContentModule and you should override the GetContent method that returns the HTML for the module as a string. The base ContentModule class exposes three important properties: a DataRow, a PageView and a Properties instance:
| Property (Data Type) | Description | |
| ParagraphRow (System.Data.DataRow) | This DataRow contains information about the current paragraph that your module is used in. It contains information like the ParagraphID, the ParagraphPageID and the ParagraphModuleSettings, which provides information about data the user has entered in the module. | |
| Pageview | (Dynamicweb.Frontend.PageView) | The PageView instance gives you information about the current page that your module is used in. It gives you access to properties like the Page, the AreaID, information like style sheets and templates that are effective and it provides access to the current User of the page. |
| Properties | (Dynamicweb.Properties) | Provides the data that the user entered in the module's Edit page. |
Within the method that outputs the HTML, you can instantiate Template objects, read template files, set Dynamicweb template tags, access your own classes and databases and so on. You'll see how to do this later.
Your method should return the HTML for the module. The following snippet shows the GetContent method of the CustomHello sample application that is part of the project you can download from the Engage web site:
[AddInName("CustomHello")]
public class Frontend : Dynamicweb.ContentModule
{
  public override string GetContent()
  {
    //Get an instance of a template object
    Dynamicweb.Templatev2.Template template = new
            Dynamicweb.Templatev2.Template("CustomHello/Template.html");
    //Set a tag named "Text" with the value from the HelloText property
    template.SetTag("Text", Properties.Values["HelloText"]);
    //Return the parsed template to the event handler
    return template.Output();
  }
}
This method creates a Template object, loads in the HTML template from disk by passing in the filename in the constructor and then sets a Dynamicweb template tag called Text. This example assumes the template exists in the designated folder under the Templates folder and that it contains a Dynamicweb template tag like <!--@Text-->. Notice how the Dynamicweb template tag looks like an HTML comment, except that it's prefixed with an @ symbol. At run time, Dynamicweb replaces all occurrences of this tag with the value you assigned to the Template instance using template.SetTag("Text", SomeValue). When assigning the value, you need to leave out the @ symbol.
In this example, the template that is used to render the UI is hard coded. In later articles in this series, you see how to use a Dynamicweb control to let a content editor choose a template when adding your module to a paragraph to create maximum flexibility with regard to the look and feel of the output of the module.
Registering the Module in the Custom Solution
To inform Dynamicweb of the existence of the module, you need to give the class an AddInName attribute. You need to pass the ModuleSystemName to its constructor:
[AddInName("MyModuleName")]
public class Frontend : Dynamicweb.ContentModule
{}
Registering the Module in the Dynamicweb Admin Interface
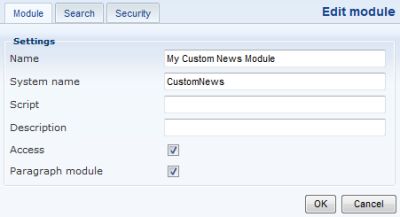
The final step is registering the module in the Dynamicweb Admin interface. To register a module you need to supply the following details:
- Name - this is what users will see in the Modules list and Modules page
- System name - The system name that is used internally to refer to this module
- Script - Optional path to an ASPX page used to manage the module in /Admin
- Description - Optional description to describe your module.
- Access - whether the module is currently enabled and active
- Paragraph module - whether the module can be inserted as a paragraph module in a page
A typical module registration screen looks like this:
Figure 2 (click to enlarge)
Caveats
The Module Edit Page is not a full blown ASPX web form. That means you can't use controls that require to be rendered in a <form runat="server" />. Using the built-in Dynamicweb controls or simple controls like an HTML input box work fine though. In part 2 a of this series you'll see an alternative that uses User Controls to bring back the ASP.NET postback architecture in your module's Edit page.
In part 3 of this article series you see how to create and register the custom module. Once the module is configured, you can add an instance of it by creating a new page with a paragraph and then inserting the module on the Module tab. You'll see how to do this in the next part as well.

