Custom Modules - Part 3 - 7 Steps to Building a Custom Module - Hands On
In the previous article in this multi-part series on Custom Module development you learned more about custom modules in Dynamicweb. You learned about system names, the Modules’s Edit page, the ContentModule base class and its GetContent method, the AddInName attribute and how to register the module in the system.
In this article you'll see how to put this theory in practice when I show you how to create a simple custom module.
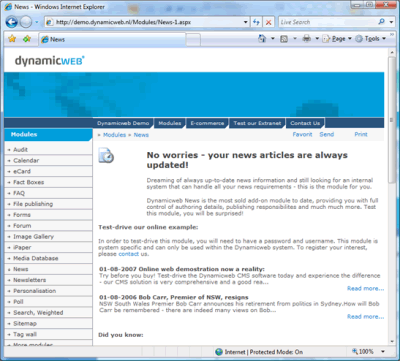
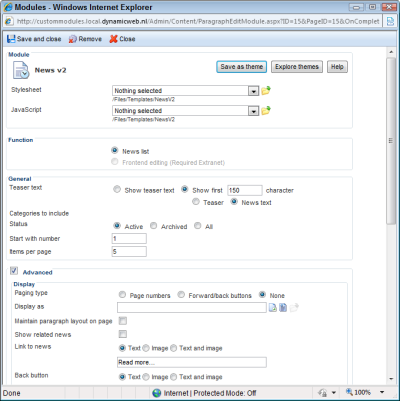
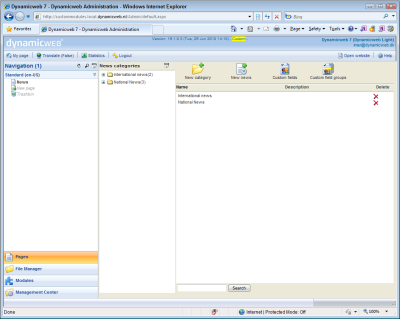
Dynamicweb modules consist of three main parts: the Public Frontend part that the end user sees, the Edit Page that a content manager interacts with when adding the module to a paragraph and an optional Administration interface that enables a user to manage content for the module. The following figures show the different parts of the built-in News Module
The Public Frontend
The Edit Page
The Administration Interface
The module I'll build in this article is extremely simple, making it easier to focus on the underlying concepts. The module does not have an Administration interface yet (I'll show you how that's done in a later article in this series), but it can be added to a paragraph on a page using the Insert Module feature of a paragraph in Dynamicweb (which loads the module's Edit page). A user adding or editing a paragraph can add the module and then enter a custom text in the module settings page. This text is then displayed in the front end page using a custom template and template tag. The module will not be able to remember its settings just yet; you'll see how to implement this behavior in the next part in this article series.
- Open the solution file C:\Projects\www.domainname.com\ApplicationCustomModulesCsharp.sln in VS 2010. The Visual Studio Conversion Wizard kicks in.
- Follow the wizard steps to convert the project and click No when asked to upgrade the project to ASP.NET 4. There are some issues that make it difficult to run under .NET 4 at the moment so you need to run it under ASP.NET 3.5. This will change with future releases though.
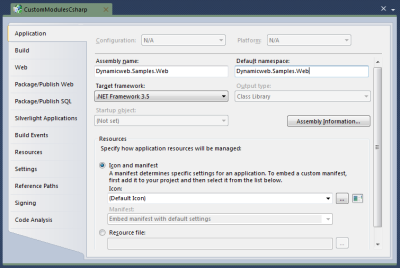
- Right-click the project in Visual Studio's Solution Explorer and choose Properties. On the Application tab set Target Framework to .NET Framework 3.5 (this may already be the case with later custom module projects by the time you read this).
- Spend some time to personalize and customize the project. For example, you may want to change the assembly name and default namespace on the Project’s Property Pages as shown in Figure 4.
Additionally, to ensure you are targeting the latest version of Dynamicweb, add a reference path to the main Bin folder of your Dynamicweb installation, as shown in Figure 5. You find this setting on the same project’s Property Pages dialog.
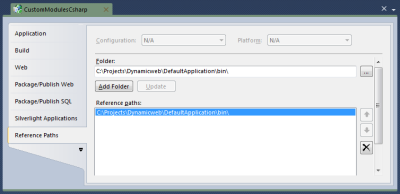
Figure 6 (click to enlarge) Finally, you may want to rename the Solution and Project files to something a bit more descriptive than CustomModulesCsharp. - In order to support debugging and running the site from within Visual Studio, you need to point the Project URL to the URL you defined for this site. You do this on the Web tab of the Properties dialog, as shown in Figure 7:
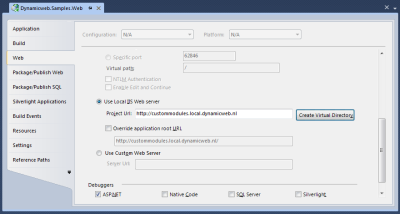
Figure 7 (click to enlarge) - In the custom solution create a new folder under CustomModules, and call it MyModule. In this case, MyModule is the system name that’s used throughout the module. Since I can be pretty sure Dynamicweb won’t come up with a new module called MyModule, I can safely use this name. For more common names, consider altering the system name with a custom prefix.
- Add a new Web Form to this folder and call it MyModule_Edit.aspx where again MyModule is the required system name and Edit.aspx is the required name suffix to hook up the module in the system.
Add the following markup to the page, replacing any content that was present in the file, except for the @Page directive:
<%@ Register Assembly="Dynamicweb.Controls"  Namespace="Dynamicweb.Controls"
              TagPrefix="dw" %>
<dw:ModuleHeader ID="ModuleHeader1" runat="server" ModuleSystemName="MyModule" />
<dw:ModuleSettings Value="HelloText" ModuleSystemName="MyModule" Runat="Server" />
<dw:GroupBox ID="GroupBox1" runat="server" Title="Text">
  <table style="width: 100%;">
  <tr>
    <td style="width: 170px;">Text</td>
    <td><input id="HelloText" class="std" type="text" runat="server" /></td>
  </tr>
  </table>
</dw:GroupBox>
Make sure you enter the correct system name in both the ModuleHeader and the ModuleSettings controls. You'll see more of the ModuleHeader and ModuleSettings controls in the next part of this article series.
- Next, create a new C# class file called MyModule.cs in the MyModule folder. If you have the Dynamicweb Templates installed in Visual Studio, you can jump start this new class by choosing ContentModule from the Dynamicweb category in the Add New Item dialog as shown in Figure 8.
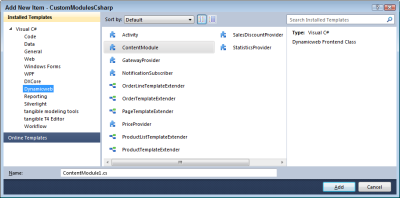
Figure 8 (click to enlarge) If you installed the templates but don't see them in the Add New Item dialog, search your hard drive for the file ContentModule.zip. You probably find it in a folder such as C:\Program Files (x86)\Microsoft Visual Studio 9.0\Common7\IDE\ItemTemplates\CSharp\Dynamicweb\1033. Copy the files in this folder and paste them in new folder called Dynamicweb under your Visual Studio's item templates folder typically located at My Documents\Visual Studio 2010\Templates\ItemTemplates.
- Complete the class as follows:
using Dynamicweb; using Dynamicweb.Extensibility; namespace Dynamicweb.Samples.Web { [AddInName("MyModule")] public class MyModule : ContentModule { public override string GetContent() { //Get an instance of a template object Dynamicweb.Templatev2.Template template = new Dynamicweb.Templatev2.Template("MyModule/Template.html"); //Set a tag named "Text" with the value from the HelloText property template.SetTag("Text", Properties.Values["HelloText"].ToString()); //Return the parsed template to the event handler return template.Output(); } } } - Build the project. It should compile without errors.
- In the Templates folder of the solution (at C:\Projects\www.DomainName.nl\Files\Templates) create a new folder called MyModule.
- In this new folder, create a template file called Template.html and add the following code to it:
- Press Ctrl+F5 to open the site in your browser, login to your Dynamicweb site and click the Management Center button at the lower left of the screen.
- Click Modules under the Developer heading.
- Click New Module and enter the details shown in Figure 9:
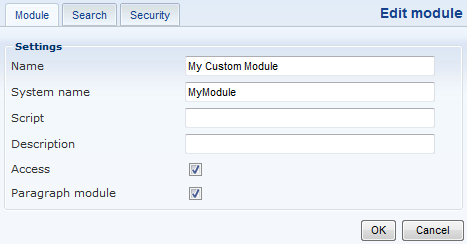
Figure 8 Make sure you enter the system name exactly as shown here, or your module won't be found at run-time. Click OK to register the module with Dynamicweb. - Click Pages in Dynamicweb to open the Navigation Pane and add a new page to the site.
- On this new page, add a new paragraph and enter a name for it. In the Show category of the Ribbon bar, click Module to Insert a Module. Choose My Custom Module.
- Enter a custom text for the Text property as shown in Figure 10:
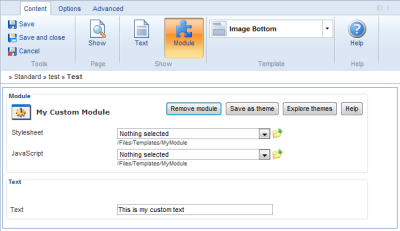
Figure 10 (click to enlarge) - Save the changes to your paragraph and page and request the page in your browser. You should see the custom text appear on the page as shown in Figure 11:
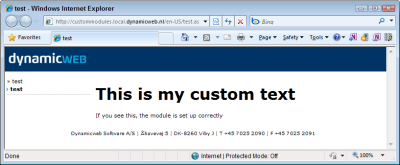
Figure 11 (click to enlarge) - Go back into the Admin section and open up the properties of the custom module in the paragraph by clicking the Module button in the Show category of the Ribbon bar. Notice how the text has disappeared. In the next article in this series you will see how to restore the text when the module is edited.
<h1><!--@Text--></h1>
<p>If you see this, the module is set up correctly</p>
Summary
In this short article you saw how to create a Custom Module called MyModule with its own Edit page that is displayed when the user adds your module to a paragraph. Additionally you wrote your own frontend class that returns the HTML for the entire module. The GetContent method in the MyModule class retrieves the data for the current paragraph (including the text you entered in step 18), loads up a Template object and then inserts your custom text in the final template output.
You can use Dynamicweb template tags and the Template object to enter your own content in the template files used by the module. As you saw earlier, Dynamicweb template tags are simple HTML comments, but prefixed with an @ symbol. You can make up your own tags, as I've done in this article with the template tag Text that looked like this:
<!--@Text-->
To fill this template tag with content, you call the SetTag method of the Template object and pass the name of the tag, without the markup and @ symbol, like this:
template.SetTag("Text", Properties.Values["HelloText"].ToString());You can pass any text you see fit to this method. In this example, a plain piece of text is retrieved from the Properties object that Dynamicweb makes available to you. The HelloText key provides access to the content you entered earlier in the module’s Edit page. However, besides plain text you can of course also pass CSS styling, class names, HTML, links to external resource files such as JavaScript and more.
To avoid conflict with existing tags it's a good idea to prefix your tags with something unique to your company or project. I often prefix them with Dvk: (for De Vier Koeden). Additionally, you can put your tags in a "namespace" by using a separation character like a dot. For example: Dvk:Article.Id would refer to an article's ID, while Dvk:Category.Id could refer to the ID of a category. The cool thing about custom template tags is that they also show up in the debug list of tags when you add <!--@DwTemplateTags--> to a template file.
At the end of the GetContent method, the complete HTML from the template is returned by calling Output(). This HTML is then injected at the location where the template is used, usually a paragraph template that has the template tag ParagraphModule.
To make your module visible to Dynamicweb you need to register it in the /Admin interface. This is necessary to have the module show up in the Insert Module page so content managers can select it. Based on the AddInName attribute Dynamicweb is able to find your Frontend class in the assemblies in the /Bin folder. Once the module is registered, users can add it to a page and interact with it.
When you edit the page with your custom module through the Navigation pane again, you'll notice the content you added earlier again is gone. You see how to fix this in the next installment in this article series about building custom modules for Dynamicweb.

