Custom Functionality – Using User Controls
NOTE: the concepts presented in this article are now considered obsolete possibly because better alternatives are available.
While Dynamicweb has support for Custom Modules to create functionality not found in Dynamicweb, sometimes these modules are a bit overkill and require too much work for simple tasks. For example, imagine you want to develop a quick form that asks the user for some details, and then sends out an e-mail message to an account determined by the data the user entered. The standard Forms module doesn't support this, and the Data Management module may be a bit too much. In those cases, it’s good to know that you can use standard ASP.NET User Controls and embed them in a web page. Here’s how.
Creating the User Control
- In your Dynamicweb Custom Module solution (or in a separate ASP.NET Web Site or Web Application Project) create a new User Control.
- Add whatever code you need to the control to complete your tasks. In my case, I am adding a few simple controls like a TextBox, a DropDownList and a Button, to let the user determine the department to send the message to, and a body for the message. I also wrapped the controls in a panel that is hidden when the message is sent, while another panel with a Thank You message is shown. Finally, to demonstrate AJAX capabilities in User Controls I wrapped the entire code in an UpdatePanel with a ProgressTemplate. This avoids page flicker and improves the user experience. I ended up with this code:
<%@ Control Language="C#" AutoEventWireup="true" CodeBehind="DataEntry.ascx.cs" Inherits="Dynamicweb.Samples.Web.DataEntry" %> <form runat="server"> <style type="text/css"> .label-column { width: 120px; } </style> <asp:ScriptManager ID="ScriptManager1" runat="server" /> <asp:UpdatePanel ID="UpdatePanel1" runat="server"> <ContentTemplate> <asp:PlaceHolder ID="MessageInput" runat="server"> <p>Choose the department, add your message and click Send to send us your comments</p> <table> <tr> <td class="label-column">Department</td> <td> <asp:DropDownList ID="Department" runat="server"> <asp:ListItem>Marketing</asp:ListItem> <asp:ListItem>Sales</asp:ListItem> <asp:ListItem>Support</asp:ListItem> </asp:DropDownList> </td> </tr> <tr> <td>Message</td> <td> <asp:TextBox ID="MessageText" runat="server" Height="136px" TextMode="MultiLine" Width="358px"></asp:TextBox> </td> </tr> <tr> <td class="style2"> </td> <td> <asp:Button ID="Send" runat="server" OnClick="Send_Click" Text="Send" /> </td> </tr> </table> </asp:PlaceHolder> <asp:PlaceHolder ID="MessageConfirmation" runat="server" Visible="false"> Message sent</asp:PlaceHolder> <asp:UpdateProgress ID="UpdateProgress1" runat="server"> <ProgressTemplate> Please wait while we send your message. </ProgressTemplate> </asp:UpdateProgress> </ContentTemplate> </asp:UpdatePanel> </form>The only thing that is different from any other User Control you would build yourself in a standard ASP.NET web site is the fact the complete code is wrapped in a server side <form />. This is required when using User Controls in Dynamicweb to work around the issue that a Dynamicweb page does not use a standard server side ASP.NET form.
- Next, in the code behind I added the following code that sends the message. Notice how I am using the selected value from the DropDownList control to determine the e-mail address to which the message needs to be sent; not something easily accomplished server side with the standard Forms or Data Management modules. Clearly, this is just an example; since everything you write here is 100% .NET, you can do whatever you can do in standard ASP.NET web applications and sites.
using System; using System.Net.Mail; namespace Dynamicweb.Samples.Web { public partial class DataEntry : System.Web.UI.UserControl { protected void Send_Click(object sender, EventArgs e) { using (MailMessage message = new MailMessage()) { message.From = new MailAddress("website@devierkoeden.com"); message.To.Add(new MailAddress( string.Format("{0}@devierkoeden.com", Department.SelectedValue))); message.Subject = "Response from web site"; message.Body = MessageText.Text; new SmtpClient().Send(message); MessageInput.Visible = false; MessageConfirmation.Visible = true; System.Threading.Thread.Sleep(5000); } } } } - I am using Thread.Sleep to halt page execution for five seconds. This makes it easier to see the AJAX behavior when the UpdateProgress control kicks in. Don’t use this in a production web site.
This is pretty much all you need for the User Control. As you can see, most of this is just standard ASP.NET stuff with all its bells and whistles such as ASP.NET AJAX and PostBacks. The only exception is the server side form wrapped around the markup of the User Control.
The next step is adding the module to a page in your web site.
Adding the User Control to your Site
To add the module to a page or paragraph, you have three options.
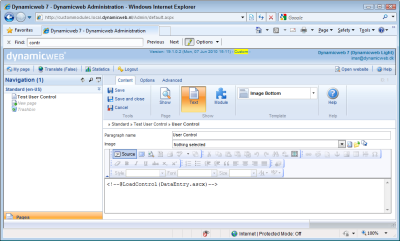
- When adding content to a paragraph, switch the Editor to Source mode and add the following code to the paragraph: <!--@LoadControl(DataEntry.ascx)--> as shown in Figure 1:
The path you enter here is relative to the root of your site, so you could insert a leading / to make that more explicit.
If you now save the page and request it in your browser, the module should appear. - Instead of entering the code directly in a paragraph, you can add it as a module. First, make sure the Insert .ascx Control module is activated in the system. Next, when editing a paragraph, click the Module button and choose Insert .ascx Control. You then get a text box where you can enter the path to a user control. You need to enter the path here manually instead of browsing to it using a FileManager control, because that control can only look in files under the Files folder. Typically, you have your User Controls directly in the root of your Application project or in a sub folder. For the output of the User Control to show up, your paragraph template needs to have a ParagraphModule template tag. Take a look at the Caveats and Problems section to read more about a problem with the Insert .ascx Control module.
- The final solution to add a User Control is to add it directly to a template. This is convenient if you want the control to appear on all pages, or in a region not normally editable through the Admin section such as a header or a footer. To add the control, you can add the following markup to a template file such as a paragraph or page template:
<!--@LoadControl(/DataEntry.ascx)-->
Again, the path you enter here is relative to the root.
No matter the way you added the control to the page, it should now appear when you request the page in the browser. You should see a drop down list, a text box and a button. When you add a message and hit the Send button, you should see the message you entered in the UpdateProgress control. After a few seconds the Message Sent text appears.
Caveats and Problems
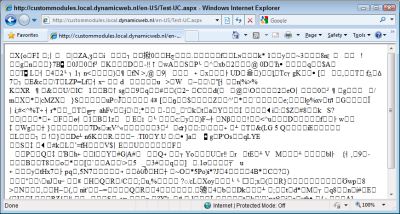
When adding user controls and enabling AJAX scenarios, you may run in some issues. For example, instead of seeing the page, you may see this instead:
I am not 100% sure, but it seems related to HTTP Compression which Dynamicweb has enabled by default. I found that removing the compression modules from the web.config seems to solve the problem. However, it may also be that just recompiling the application because of the changed web.config solves the problem as I've also seen it work with compression turned on. In future versions of Dynamicweb the implementation of compression may change, so this behavior may change as well. It’s up to you to determine if using User Controls makes up for the lack of HTTP Compression.
You may also find that using the Insert .ascx Control module does not add the module to the page. This seems to be a bug, and I will update this article when I find a solution.
If your AJAX functionality doesn't seem to work, check the web.config file and make sure that the mode property of the xhtmlConformance element is set to Transitional, like this:
<system.web>
  ...
  <xhtmlConformance mode="Transitional"/>
  ...
</system.web>
Older versions of Dynamicweb or the custom module project may have set this to Legacy, in which case the UpdatePanel control doesn't function correctly.
The final caveat you need to be aware of is the fact that the User Control uses a <form /> with its runat attribute set to server. Since the control now outputs a complete form, you can’t embed a user control within another form tag in a page or paragraph template as you’re not allowed to nest HTML forms. It’s typically easy to work around this by moving the form tags around a bit in your templates so the User Control doesn't interfere with them.
You can download the User Control here. If you want to use it, add it to a Custom Modules project, compile it and the register the control as explained in this article. If you also want to send an e-mail with it you need to add the necessary SMTP configuration to web.config as you normally would.
TIP
The User Control I built in this article is based on a Web Application Project in Visual Studio. This means you also need to deploy the resulting DLL file with your User Controls as that’s where the code in the Code Behind ends up. To make deployment easier, you can create a new Web Site in Visual Studio instead (using File | New Web Site rather than File | New Project). User Controls you add to a Web Site are compiled on the fly on the server. That means that all you need to deploy to your production server is the .ascx file and its associated Code Behind file (or just the .ascx file if you’re not using Code Behind).


