About this article
Custom Modules - Part 1 - Introduction
Note: This article series was written against Dynamicweb 7.2. Many concepts still apply but the details may have changed.
One of the most important extensibility points in Dynamicweb are Custom Modules. When developed correctly, Custom Modules can look and behave in exactly the same way as the built-in Dynamicweb modules do, making it easier for your end users to use them.
Custom Modules can be really simple or they can be very extensive and complex. Building a simple Hello World can be done in a minute or so, while building a module such as the eCommerce Product Catalog is likely to take a little longer.
In this series on Custom Modules I'll show you how to create a Custom Module from scratch and extend it with many features. In this first part I'll show you how to set up Dynamicweb and IIS for custom module development. In the next installment, I'll demonstrate how to configure the project in Visual Studio. After these two starting articles, I plan to address the following topics:
- How to build a simple Article module with articles and categories
- How to work with user input
- How to build Admin modules that take advantage of the built-in Ribbon and other UI controls (this will be an article series on its own)
- Ways to access data from a module
- Ways to make your module more SEO friendly
- ...
Part of this article series is taken from the Dutch training material for Custom Modules so it may be familiar to some of you.
Acquiring the Files
To follow along with this article series and build your own custom modules you need to download Dynamicweb, the default files and database and the custom modules starting point project from the Engage web site. If you don't have an account to access the protected Downloads section of the site, contact your distributor. From the Downloads section, make sure you download the following files:
- The Dynamicweb core files (currently, the latest version is Application(19.1.0.3).zip)
- The Default Empty Data for SQL Server 2005 (DefaultEmptyDataSQL.zip )
- The C# Custom Modules project (CustomModulesCsharp.zip)
Download and save these files to a folder on your local machine. Then read on to learn how to install Dynamicweb for Custom Module development.
Installing Dynamicweb
The following sections guide you through the process of setting up a Dynamicweb installation that can be used to develop and run custom modules. It’s assumed you followed the instructions from the previous section and now have a copy of the following files:
| File Name | Description |
| Application(19.x.x.x).zip | Contains the standard Dynamicweb files for the /Admin section and the core assemblies. At the time of writing, the most recent version is Application(19.1.0.3).zip but that may have changed by the time you read this. You should always get the most recent version from the Dynamicweb Engage web site when you’re starting a new project. |
| DefaultEmptyDataAccess.zip | Contains the standard template files and Microsoft Access databases. You don't need this file if you're using Microsoft SQL Server for the database. |
| DefaultEmptyDataSql.zip | Contains the standard template files and a backup of a default Microsoft SQL Server database. You don't need this file if you're using Microsoft Access for the database. |
| CustomModulesCsharp.zip | Contains the project files for the Custom Module project in C#. I'll be using this project and the C# programming language in this article series, but rest assured knowing that you can do the exact same things in Dynamicweb when using Visual Basic. |
| CustomModulesVB.zip | Contains the project files for the Custom Module project in Visual Basic. |
If you downloaded the files from a web server, make sure the files are not blocked by the Windows file blocking security feature. To unblock the files, open up the Properties dialog for the file in Windows Explorer and click the Unblock button, shown in Figure 1:
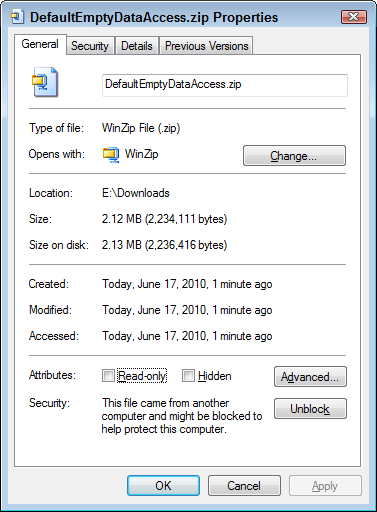
Figure 1
With the blocking feature still turned on, unzipping these files may take a very long time and you may run into other issues later.
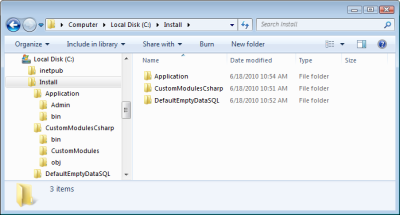
Unzip the files Application(19.x.x.x).zip, DefaultEmptyDataSql.zip and CustomModulesCSharp.zip files to a folder called C:\Install so you end up with the directory structure shown in Figure 2 (click to get a larger version of the image).
Figure 2
Once all the files are downloaded and unzipped to C:\Install, perform the following steps to install the custom solution:
- Create a folder called C:\Projects\Dynamicweb\DefaultApplication. This folder will hold the default Admin section for all sites with custom modules. For this series, I am only building a single site that uses this solution, but if you are hosting multiple custom solutions on your own server, they can all share this central DefaultApplication folder. If you then update this central folder with the latest version of Dynamicweb, all sites on your server get updated automatically.
- Create a folder called C:\Projects\www.domainname.com. This folder will hold the Application and Files folders for the site with the custom modules.
- Move all files and folders from C:\Install\Application into C:\Projects\Dynamicweb\DefaultApplication. You should end up with folders like C:\Projects\Dynamicweb\DefaultApplication\Admin and files like C:\Projects\Dynamicweb\DefaultApplication\web.config.
- Copy the CustomModulesCsharp folder from C:\Install into C:\Projects\www.domainname.com. Then rename the folder to Application. You should end up with folders like C:\Projects\www.domainname.com\Application\Bin and C:\Projects\ www.domainname.com\Application\CustomModules.
- Copy the Files folder from C:\Install\DefaultEmptyDataSql into C:\Projects\www.domainname.com. When you're done you should have the following folder structure shown in Figure 3:
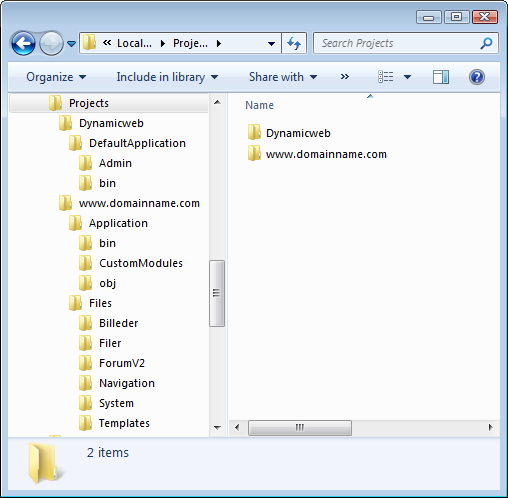
Figure 3
By following the steps outlined in this section, creating a second web site is now very easy: just repeat steps 4 and 5, creating a new domain specific folder under C:\Projects such as C:\Projects\www.otherdomain.com. Both sites can then share the same application folder for /Admin as shown in the next section.
Configuring IIS
With the files in place, the next step is to configure IIS. I’ll be showing you the steps needed for IIS 7 and Microsoft SQL Server as the database engine. You can use these steps to setup IIS under Windows 7 and Windows Server 20008. Earlier versions of Windows work similar, but may require slightly different steps. Consult the Dynamicweb installation documentation or the IIS documentation for more details.
- Open up the IIS Manager (click start, type inetmgr and hit enter). Expand your server under the connections panel on the left, right-click Sites and choose Add Web Site. Assign a site name (such as www.domainname.com) and point its Physical Path to C:\Projects\www.domainname.com\Application. If you want to use a domain name for the site as well, enter one in the Host Name field. Without a host name, the site is accessible at http://localhost. To avoid conflicts with existing sites on the same machine you can choose any domain name that ends with local.dynamicweb.nl. In the internet DNS, the * record *.local.dynamicweb.nl has been configured to always point to the local machine at 127.0.0.1 so you can just make up a domain name such as custommodules.local.dynamicweb.nl.
- Create a new Virtual Directory called Admin and point it to C:\Projects\Dynamicweb\DefaultApplication\Admin. For IIS 6, it is important that this folder is not marked as an application. If it is, open its Properties dialog and on the Virtual Directory tab click the Remove button to convert the application into a simple virtual directory.
- Create a new Virtual Directory called Files and point it to C:\Projects\www.domainname.com\Files. Again, for IIS 6, it is important that this folder is not marked as an application. If it is, open its Properties dialog and on the Virtual Directory tab click the Remove button to convert the application into a simple virtual directory.
- If you are using Microsoft Access instead of Microsoft SQL Server, create a new Virtual Directory called Database and point it to C:\Projects\www.domainname.com\Database. For IIS 6, it is important that this folder is not marked as an application. If it is, open its Properties dialog and on the Virtual Directory tab click the Remove button to convert the application into a simple virtual directory. Make sure the Database folder contains the databases from the non-SQL DefaultEmptyDataAccess.zip file archive.
- Next, click the Application Pools node of the Internet Information Manager and locate your Application Pool. By default, it should be named after your web site and thus has a name such as www.domainname.com. Make sure the application pool uses Microsoft .NET 2.0, runs in Integrated Mode and has “Enable 32-Bit applications” set to True when running on a 64 Bits machine as shown in Figure 4:
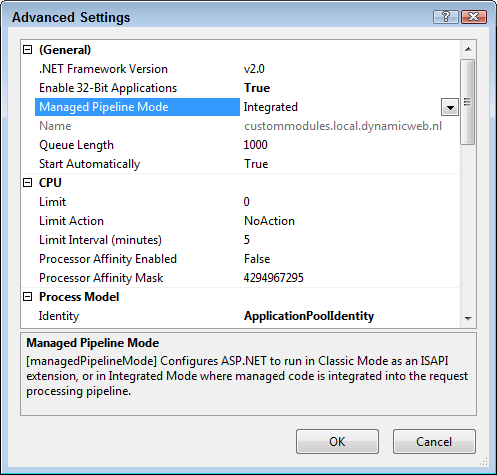
Figure 4
- Next, you have to make sure your custom solution uses the latest release of Dynamicweb. In order to do this, copy all DLLs from the Bin folder of the DefaultApplication (located at C:\Projects\Dynamicweb\DefaultApplication\bin) and paste them in the Bin folder of your application at C:\Projects\www.domainname.com\Application\bin. Overwrite any existing file when asked.
- See standard installation instructions ((en-US) Installation Guide, Dynamicweb 7) for information about IIS and NTFS security settings for the application’s folders and files. On a development machine, you could grant Full Control to Everyone on the C:\Projects folder. Make sure you don't do this in a production environment!!
Configuring the Database
The next step in the process is setting up and configuring your database under SQL Server. If you’re setting up the site to use Microsoft Access, you can skip this section as no extra steps are required.
- Open the SQL Server 2008 Management Studio from the Start Menu and connect to your instance of SQL Server (both Express as commercial versions are supported). I am using SQL Server 2008 here but SQL Server 2005 is supported as well.
- In the Object Explorer on the left right-click on the Databases node and select New Database. Create a new database with a name such as DomainNameCom. In am calling mine CustomModulesSamples.
- Right-click on the newly created database and select Tasks | Restore | Database. A new window appears called Restore Database. In the Source For Restore section select the From Device option and click on the browse button that just got enabled on the right marked with ellipses. Click Add and browse to C:\Projects\www.domainname.com where you should find a backed-up database called DefaultEmptyData.bak. Select Ok until you are back in the Restore Database window. Under "Select the backup sets to restore", check the checkbox for DefaultEmptyData-Full Database Backup. Switch to the Options tab on the left. In this dialog check the first checkbox with the text: Overwrite the existing database (WITH REPLACE). Press Ok to restore the database.
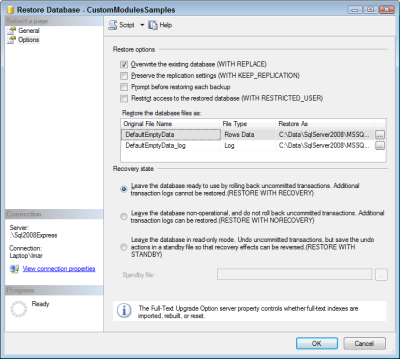
- Figure 5 (click to enlarge)
- You can now delete the database backup as you no longer need it.
- For Dynamicweb to access the database you need to configure the permissions for a user account in SQL Server. Refer to this article for more details about configuring SQL Server security and check out the Dynamicweb installation instructions for general security guidelines. Remember that in order for Dynamicweb to successfully use the database, the accounts needs to be assigned to the db_datareader, db_datawriter and db_ddladmin roles.
- Be aware that if you’re using Windows 7 or Windows Server 2008, the default account used by the web server is called IIS AppPool\ApplicationPoolName. E.g. for a site called www.DomainName.com, the account is called IIS AppPool\www.domainname.com.
- Next, you need to grant yourself access to Dynamicweb by resetting the password of the existing admin account. Using SQL Server Management Studio, open the Tables folder in the Object Explorer for your database and locate the AccessUser table. To open the table, right click on it and click select Edit Top 200 rows. Modify the SQL statement so it only selects the columns AccessUserUserName and AccessUserPassword and run the query.
- Change the password for the Administrator account in the AccessUser table to admin. Close the table. The next time you change the password for this account in the backend of Dynamicweb, it will be hashed again to improve security.
- By default Dynamicweb uses a Microsoft Access database so you have to change the configuration in GlobalSettings.aspx to point Dynamicweb to the MS SQL Database. Using Windows Explorer, browse to C:\Projects\www.domainname.com\Files. Open the GlobalSettings.aspx file in Visual Studio or a text editor and locate the <Database> element. Modify its contents as follows:
<Database>
  <Password>
  </Password>
  <Type>ms_sqlserver</Type>
  <UserName>
  </UserName>
  <Database> CustomModulesSamples</Database>
  <SQLServer>.\SQLEXPRESS</SQLServer>
  <IntegratedSecurity>True</IntegratedSecurity>
</Database>
- Modify the nodes Database, SQLServer and IntegratedSecurity nodes to match your database server and security mechanism.
- Save changes to the file and close it.
- Browse to http://localhost/Admin or an address such as http://custommodules.local.dynamicweb.nl/Admin if that’s what you configured earlier. You should be able to login with the user name Administrator and the password you created earlier. Instead of seeing the Login screen of Dynamicweb, you may get the following error (click for a larger image)
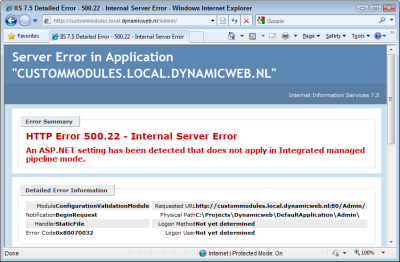
- Figure 6
- When that happens, follow the on-screen instructions by running a command such as the following in an Administrative Command Prompt:
- %SystemRoot%\system32\inetsrv\appcmd migrate config "SiteName/"
- where SiteName refers to the name of your site; custommodules.local.dynamicweb.nl in my case.
- If you try again, and then get the error shown in Figure 7, make sure you copied the assemblies from the main Dynamicweb application, and make sure you unblocked the files as shown earlier in this article. If you didn't unblock the zip files before you extracted their contents, you'll need to repeat most of this article, by unblocking the files, extracting their contents and copying them to the right locations. You may also need to restart the Application Pool or IIS.
-
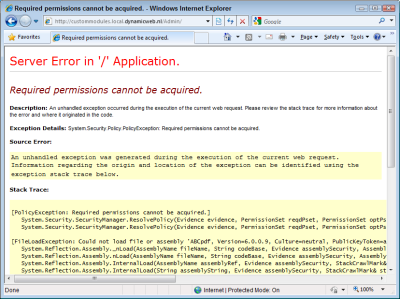
- Figure 7 (Click to enlarge)
- If you get an error about Request not being available in the current context, make sure you copied the assemblies from the main application’s bin folder in your custom bin folder located at C:\Projects\www.domainname.com\Application\bin as explained earlier. If the error persists, open the project in Visual Studio, upgrade it to run under .NET 3.5 and recompile it. This is discussed in detail in part 3 of this series that explains how to open and configure the Custom Modules project in Visual Studio 2010.
- If everything is set up correctly, you should now be able to browse to http://custommodules.local.dynamicweb.nl/Admin or the URL you configured for the site followed by /Admin.
- If you get logged on automatically in Danish, choose Tools | Log out and then log in again using the user name and password you set up in the database earlier. If the site is still in Danish, click Management Center and then Løsningsindstillinger under System. Next, under Kundeadgang choose your favorite language from the Standardsprog drop down list and click Gem (Save). You'll need to log out and log in again for the changes to be applied.
- Most of the problems that may occur after this stage can be resolved by running the update scripts, especially when you are working with different version of the Files folder and Dynamicweb Application. This can happen when you have downloaded a new Dynamicweb release. You can run the update scripts by setting the version values in Files\update.xml to 100 and Files\UpdateVersion_ecom.xml to 10 and then restarting the application (for example, by making the web.config file of the application dirty). Rerunning the site in your browser should fire the Application_Start event which in turn updates the database and the Files folder.
Summary
In this article you saw how to install a Dynamicweb Custom Solution. By installing the main application in the folder C:\Projects\Dynamicweb\DefaultApplication\ you create a reusable setup because you can share its Admin folder across multiple custom solution installations. The files stored in C:\Projects\www.domainname.com\ are application specific (including the ASP.NET project in the Application folder) and only apply to the www.domainname.com domain.
In the next installment in this series you see how to register and test a simple custom module. In later articles in the series you’ll see how to build more useful custom functionality.

