About this article
Custom Modules - Part 5 - Building Modules with a Module Admin Page
NOTE: the concepts presented in this article are now considered obsolete possibly because better alternatives are available.
In addition to providing a Module Edit page and a front end interface as you saw in the previous article in this series, you can also let your users interact with your module through the Modules list in the Admin interface. To do this, you need to follow these two steps:
- When registering the module, provide a path to the main entrance of the Admin section of your custom module. You do this by setting the full path to your module's page like this:
/CustomModules/SystemName/OptionalSubFolders/EntrancePageName.aspx
The italic parts differ from module to module.
- Create one or more pages in your custom module's folder to let a user interact with the module. Typical examples of pages are List Pages, details pages that allow users to enter new or manage existing items in your module, manage categories and so on.
The good thing about the pages in this Admin section is that they are easy to create: since they can be true ASP.NET pages and can make use of the standard ASP.NET postback architecture, you can apply all your existing knowledge about ASP.NET Web Forms. In this article I'll show you how to build a simple Article module, much like the one I am using on this web site to display my custom articles. I'll use the same module again in later parts to show you how to make use of the new Ribbon interface.
Creating Your Own Articles Module - The Articles List
In this article I'll create a database that holds articles and categories. The articles can be managed through custom ASP.NET pages configured in the Dynamicweb Admin interface. In the next article in this series I'll use the same articles again to build a Custom Module to show the articles in the front end.
Because everything in the Admin pages is 100% ASP.NET, you're free to choose your own database technology, including:
- ADO.NET Entity Framework
- NHibernate
- Custom Code
- SqlDataSource controls
- More....
Additionally, you can let Dynamicweb generate code for you based on your data model. To use this feature, choose Management Center, and then under Developer click Code generation, select your database, table and primary key, and programming language (both Visual Basic and C# are supported; if the VB templates don't seem to work for you, make sure you use at least version 19.1.0.5) and click Generate. Dynamicweb generates the code for a CRUD class with some additional methods (like renderers) for you. In versions of Dynamicweb before 19.1.0.5, the list with table names was unsorted which made it pretty difficult to find your own tables; fortunately, this is now fixed.
In this article series, I'll use the Microsoft ADO.NET Entity Framework as I find it very easy to work with, yet very powerful and flexible.
Database Design
You have two options to choose from when determining where to store your data: in the Dynamicweb database associated with the web site, or in a separate database (SQL Server, Access, or what have you). I typically store my own tables in the Dynamicweb database as I find it easier to deploy my solutions when everything is packed together in a single database. In the SQL Server database for my web site, I created the following two tables:
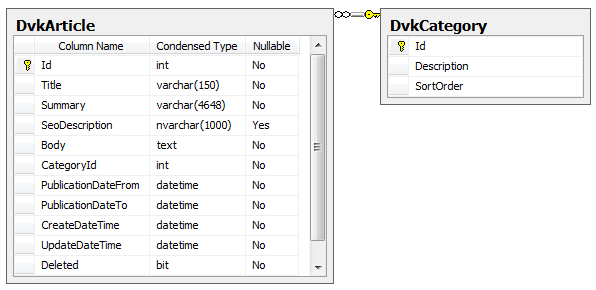
Figure 1
Notice how I prefixed each table with Dvk (from De Vier Koeden) to avoid possible future problems with Dynamicweb tables that may have the same name. I'll strip off the prefix when creating my ADO.NET Entity Model.
Based on this database, I created the following model using the ADO.NET Entity Designer:
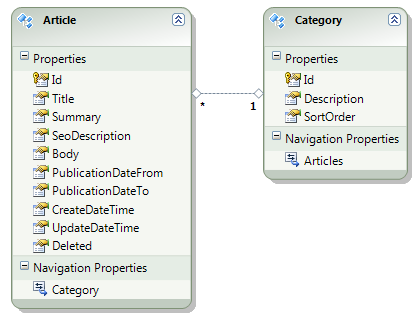
Figure 2
In order to give the entities more readable names, I stripped off the Dvk prefix from the entity names and entity set names. Additionally, I renamed the navigation properties to Articles and Category respectively.
The CreateDateTime and UpdateDateTime determine when an article was created and last modified. This data is used on the front end to show when the article was created or last modified. The PublicationDate properties determine if an article can be shown in the front end. This enables you to create content in advance that appears automatically after a given data, or that disappears automatically when it's no longer appropriate.
Creating Admin Pages
To use the model in the application and let users manage the articles, I carried out the following steps:
- I created a new folder under CustomModules called DvkArticles (the system name of my module).
- Inside this folder I created a new folder called Admin. This is not required, but by storing the files in a separate folder, all the admin files are nicely packed together.
- In this Admin folder I created a Default.aspx file with a Repeater control to display all the available articles using an EntityDataSource control. Each item in the list of articles has an Edit and a Delete link. You'll see more of this later.
- Next, I created a file called AddEditArticle.aspx with controls such as TextBox and DropDownList to manage the article. Additionally, I am using the dw:DateSelector to enable users to set the PublicationDate properties. In the code behind of that page I load and save the article using the Entity Framework. You'll see more of this page later.
- I added an DeleteArticle.aspx page that deletes the requested article from the database.
- Finally, I registered the module and its Admin page in the Dynamicweb Management Center.
Once I added the files and folders listed above, I ended up with the following Solution Explorer:
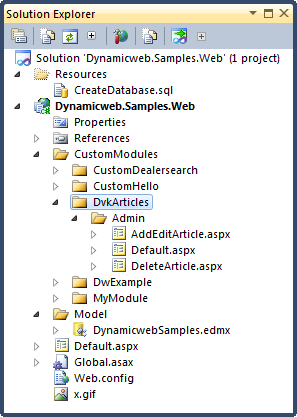
Figure 3
I'll now show you some of the implementation of these pages. Since most of it is standard ASP.NET and Entity Framework code, I won't dig deep into a lot of code, but instead show you some of the parts that are relevant to custom module development. You're encouraged to look at the source for the application that you can download at the end of the article.
The Articles List Page
This page is a simple ASP.NET page with a Repeater and an EntityDataSource. To give the page the Dynamicweb look and feel, I included a reference to the stylesheet /Admin/Stylesheet.css in the <head /> of the page, like this
<head id="Head1" runat="server">
  <title>Manage articles</title>
  <link rel="Stylesheet" type="text/css" href="/Admin/Stylesheet.css" />
</head>
Next, to create tabs at the top of the page, I used the Dynamicweb TabHeader control which displays tabs as can be seen in Figure 5, 6 and 7. Right now, I only have one tab, but you could add more; for example to manage the categories in the database. To display tabs, you need to add the TabHeader, and assign a comma separated list of tab names to its Headers property; one for each tab you want to create. Then for each tab, add a <div /> element with its id set to TabN where N is a sequential number starting at 1. Additionally, you should apply the CSS class tabTable, like this:
<form id="Form1" method="post" runat="server">
<dw:TabHeader ID="List" Title="Articles" TotalWidth="602"
             runat="server" Headers="Articles" />
<div id="Tab1" style="display: block; padding: 4px;" class="tabTable">
 -- Content goes here
</div>
In my (only) tab, I added a Repeater control to display the articles. Each item in the Repeater's ItemTemplate has a link to the AddEditArticle.aspx page, like this:
<asp:HyperLink ID="lnkEdit" runat="server"
     NavigateUrl='<%# "AddEditArticle.aspx?Id=" +
          DataBinder.Eval(Container.DataItem, "Id") %>'>Edit
</asp:HyperLink>
Additionally, to enable a user to create new articles, the page contains a direct link to AddEditArticle.aspx without an ID in the query string:
<a href="AddEditArticle.aspx">New Article</a>
The Article Edit Page
AddEditArticle.aspx is pretty straight forward as well. It contains the same TabHeader control and CSS file reference, and contains a number of controls to let a user enter data for the article. To let a user select a date, I use the dw:DateSelector control:
<dw:DateSelector ID="PublishFrom" runat="server" />
which renders the following user interface:
![]()
Figure 4
To make an article never expire by default, I set the SetNeverExpire property of the PublicationDateTo control to true like this:
<dw:DateSelector ID="PublishTo" runat="server" SetNeverExpire="true" />
This causes the control to set the selected year to Never which in turn forces the control to return a date far in the future, effectively causing the item to never expire.
To get the date from the DateSelector, you can access its Date property, as shown in the code below that saves an article to the database using the Entity Framework:
protected void SaveButton_Click(object sender, EventArgs e)
{
  Article article;
  using (CustomModulesSamplesEntities db = new CustomModulesSamplesEntities())
  {
    if (Id > 0)
    {
      article = db.Articles.Include("Category").Where(
               a => a.Id == Id).FirstOrDefault();
    }
    else
    {
      article = new Article();
      article.CreateDateTime = DateTime.Now;
      db.AddToArticles(article);
    }
    article.Body = Body.Text;
    int categoryId = Convert.ToInt32(CategoryList.SelectedValue);
    article.Category = db.Categories.Where(c => c.Id == categoryId).FirstOrDefault();
    article.PublicationDateFrom = PublishFrom.Date;
    article.PublicationDateTo = PublishTo.Date;
    article.SeoDescription = SeoDescription.Text;
    article.Summary = Summary.Text;
    article.Title = ArticleTitle.Text;
    article.UpdateDateTime = DateTime.Now;
    db.SaveChanges();
    EndEditing();
  }
}
The rest of the code is pretty straight forward code targeting EF using LINQ. When the item is saved, the user is redirected back to Default.aspx using the EndEditing method.
To give the controls in the page the Dynamicweb look and feel, you can apply the std class to most controls. Buttons by default need the buttonSubmit class; both are shown in the next code snippet:
<asp:TextBox ID="Body" runat="server" TextMode="MultiLine" CssClass="std"></asp:TextBox>
<asp:Button ID="SaveButton" runat="server" CssClass="buttonSubmit"
                    OnClick="SaveButton_Click" Text="Save" />
The std class gives controls such as a text box and a drop down list a default font and width.
Deleting an Article
This is the easiest page in the module; in Page_Load, the code retrieves the ID of the article from the Query String, sets its Deleted property to true, saves the changes and redirects back to Default.aspx:
protected void Page_Load(object sender, EventArgs e)
{
  if (Id > 0)
  {
    using (CustomModulesSamplesEntities db = new CustomModulesSamplesEntities())
    {
      Article article = db.Articles.Where(a => a.Id == Id).FirstOrDefault();
      article.Deleted = true;
      db.SaveChanges();
      Response.Redirect("Default.aspx");
    }
  }
}
The Id property is a private property that returns the requested ID from the Query String.
Registering the Module
With the basic CRUD functionality (Create, Read, Update and Delete) for the articles done, the final step is registering the module with Dynamicweb. To do that follow these steps:
- Login in your Dynamicweb Admin interface
- Click Management Center and then under the Developer heading click Modules
- Register the module by entering a friendly name and the system name, and then supply the following path for the Script field: /CustomModules/DvkArticles/Admin/Default.aspx. The Settings screen should end up as in Figure 5:
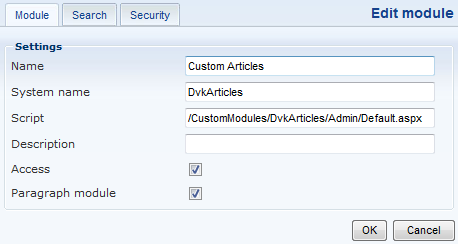
Figure 5
Once the module is registered, it's listed in the main Modules page. The name of the module is now linked to the main page in your custom Admin section. You can then enter a new article by clicking the New Article link. You'll see the following screen appear:
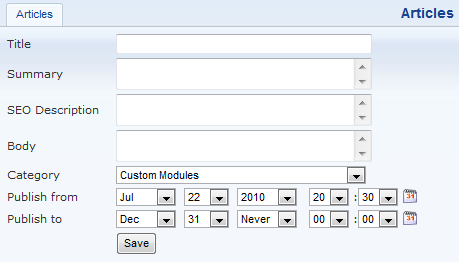
Figure 6
Notice how the Year of the end date has been set to Never to create an article that never expires by default. Enter some data and click Save. The articles you add here now end up in the main articles list, as shown in Figure 7:

Figure 7
Enhancing the Module
In this example, the module uses simple TextBox controls to accept user input. In a more realistic scenario, you probably want to use the dw:Editor control for that, or implement a custom editor such as the CKEditor. If you use editors like this that submit HTML, be sure to set ValidateRequest="false" at the page or web.config level or ASP.NET will reject all form posts that contain HTML. Another enhancement you could (and should) make is data validation. Currently, none of the fields is checked for a valid value. However, using ASP.NET Validation controls or custom code, it shouldn't be to too hard to stop users from entering incorrect data.
In a later part in this series, I'll enhance this module by implementing the Ribbon interface, and some of the other new Dynamicweb User Interface controls, getting rid of the slight dull looking screens that the module has now.
Summary
If you're an experienced ASP.NET developer, you probably haven't see a lot of new things in this article. That's a good thing, as it means that you can use your existing skill set to create pages in the Admin section of Dynamicweb to manage your own data.
In the next article in this series I'll extend this module by creating a front end class that outputs the content in the web site. You'll see how to use Template Loops to display a list of articles in a single page.
Downloads
With each article, I'll make a download available with the module I've built so far. Additionally, you can download the full running demo with all changes up to the latest part in the series. The first download always shows the code from the article you're reading, while the second download is the full example and may contain code that is added or changed in later parts of the series.
