Custom Modules - Part 8 - Miscellaneous Tips
Over the past couple of months I have introduced you to building custom modules with Dynamicweb. In the past 7 articles in this series you saw how to build a new module from scratch to manage articles in a database and display them at the front end. You got some background on custom modules, saw how to build an Edit page and an administrative interface, learned how to use the Code Generation tools, how to work with templates and template loops, and how to deal with user input. Armed with this knowledge, you should now be able to build pretty much any module you need.
In the next few articles in this series, I'll show you how to enhance the administrative interface of your module by implementing the Ribbon bar and other controls from the new Dynamicweb User Interface. But before we look at these new controls, this article gives you a few miscellaneous tips on working with custom modules to improve the way they look and behave and to make your live as a developer a little easier.
If you've been working with Dynamicweb for some time and have other tips to share: let me know and I'll add them to this list.
1. Providing icons
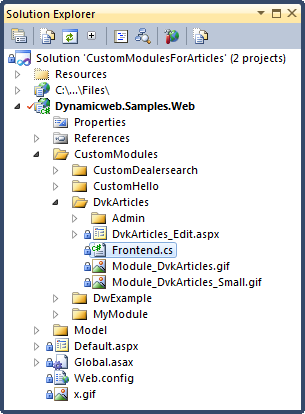
It's easy to provide custom icons for your custom modules. The icons you provide will be shown in the module list in the Administrative Interface, and when the module is added to a paragraph. To assign icons to your module, just save the following two GIF images in your custom module's main folder:
| Name | Size |
| Module_ModuleName.gif | 32 x 32 pixels |
| Module_ModuleName_Small.gif | 16 x 16 pixels |
You need to replace ModuleName with the system name of your module. For my custom articles module I added the images like this:

Figure 1
The small image is now displayed in the Modules list like this:

Figure 2
while the large icon is used when inserting or updating your module on a paragraph:
2. Hide modules from the Insert Module page
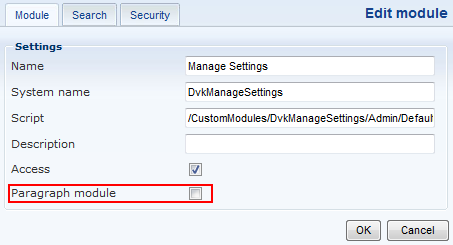
If you've built a module that is used just in the backend and should not be added to a paragraph (for example, for a module that just manages data or settings), make sure you disable the Paragraph Module option when registering the module. The following module will be visible in the main Modules list, but won't show up when adding a module to a paragraph:

Figure 4
3. Enable your users to select a template
Part of the power of Dynamicweb's template engine is the ability for content managers to select a template. This makes it easy to create multiple versions of a template and select the appropriate one for a specific page.
In the Edit page of the Custom Articles module I've built in this article series I haven't shown you how to do this. Fortunately, it's easy to do. I'll show you the relevant bits and pieces here, but you can find the complete solution in the Downloads section at the end of this article. The downloadable sample solution features two templates: for the list of articles and for the details page. In the previous article in this series I simply returned a hard coded string for the details of an article, but I've made the output template based now as well.
To let a user select a template, follow these steps:
- First, in the module's Edit page, add a dw:FileManager control, give it an ID and a Name and set the Folder property to a path that points to your custom module's template folder. Here's an example for the List template of the custom articles module:
<dw:FileManager ID="ListTemplate" runat="server"
      Folder="Templates/DvkArticles" Name="ListTemplate" />
Setting the Folder property like this locks the user in the DvkArticles folder, minimizing the chance the user picks an incompatible template file.
- Next, register the template field in the ModuleSettings control for the Edit page like this:
<dw:ModuleSettings ID="ModuleSettings1" Value="ListTemplate" ModuleSystemName="DvkArticles" Runat="Server" /> - Provide a default value for the template and pre select the correct item in the FileManager when the module is edited by adding the following code to the Page_Load method of the Edit page:
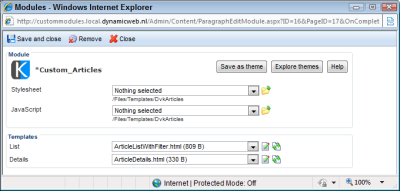
protected void Page_Load(object sender, EventArgs e) { Properties properties = Dynamicweb.Properties.LoadProperties(); //Set default values properties.SetDefaultValue("ListTemplate", "ArticleList.html"); // Pre select the correct item ListTemplate.File = properties.Values["ListTemplate"].ToString(); } - With this code in place, the user can now choose a template from the drop down list, as shown in Figure 5:
When a template has been picked and the module is edited again afterward, the chosen template gets pre selected automatically.
- The final step involves modifying the code in the Frontend class of the custom module so it takes the chosen template into account. For the DvkArticles module, this means changing this code:
to this:Dynamicweb.Templatev2.Template listTemplate = new Dynamicweb.Templatev2.Template("DvkArticles/ArticleListWithFilter.html");
From now on, users can select and manage templates for your custom module as they would for any other built-in Dynamicweb module. In the next tip you see a better way of getting hold of the template the user has chosen.Dynamicweb.Templatev2.Template listTemplate = new Dynamicweb.Templatev2.Template("DvkArticles/" + Properties.Values["ListTemplate"].ToString());
4. Create page scoped properties for values coming from the Properties object
Due to its untyped nature, getting values from the Properties object isn't always that straightforward. Consider the code you need to get an optional integer out of the Properties object:
int categoryId = 0;
if (Properties.Values["CategoryId"] != null)
{
  int.TryParse(Properties.Values["CategoryId"].ToString(), out categoryId);
}
In itself this code isn't so bad to write, but it gets boring after a while, especially when you need it to access the CategoryId often. A better solution is to create a read-only property in your module that returns the correct value. The benefit of encapsulating this code in a property is that you can also provide a default value, as shown in this code for the ListTemplate value:
public string ListTemplate
{
  get
  {
    object temp = Properties.Values["ListTemplate"];
    if (temp != null && !string.IsNullOrEmpty(temp.ToString()))
    {
      return temp.ToString();
    }
    // Optional: return a default value
    return "ArticleList.html";
    // Alternatively, throw an exception
    // throw new ArgumentNullException("ListTemplate",
    //      "No ListTemplate has been set in the module's Edit page.");
  }
}
You can now use the new ListTemplate property like this:
Dynamicweb.Templatev2.Template listTemplate =
    new Dynamicweb.Templatev2.Template("DvkArticles/" + ListTemplate;
This way, the module's values are easier to manage and you gain a bit of type safety as well.
5. Create a base class for your module
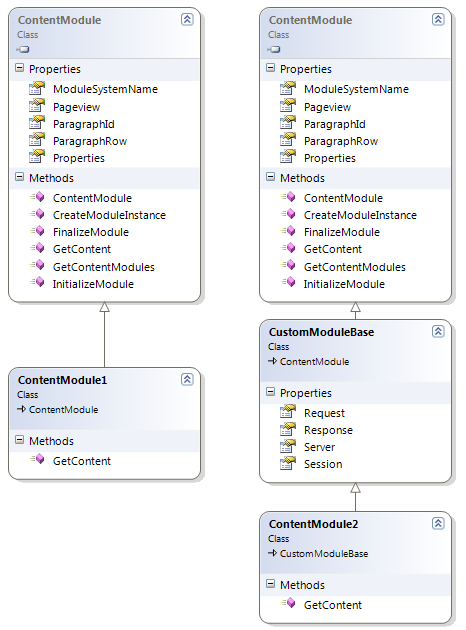
As you saw in part 2 of this series, your custom modules need to inherit the Dynamicweb ContentModule class. This inheritance is required, as otherwise Dynamicweb won't be able to recognize your module. However, it's not required to directly inherit ContentModule. It's perfectly acceptable and useful to create an intermediate class that inherits ContentModule. Your custom module's Frontend class then inherits this intermediate class. By creating an intermediate class, you can abstract common behavior from your module's class to the super class. This is convenient, for example, for properties you need to access often. To see how this works, take a look at Figure 6.

Figure 6
The left hand side of the figure shows how a custom module that directly inherits ContentModule. On the right side of the figure, you see a module that inherits CustomModuleBase instead. This custom created class inherits ContentModule and adds four common properties: for Request, Response, Server and Session. The code for the CustomModuleBase class looks like this:
using System.Web;
using System.Web.SessionState;
using Dynamicweb;
namespace Dynamicweb.Samples.Web
{
  public class CustomModuleBase : ContentModule
  {
    public HttpRequest Request
    {
      get { return HttpContext.Current.Request; }
    }
    public HttpResponse Response
    {
      get { return HttpContext.Current.Response; }
    }
    public HttpSessionState Session
    {
      get { return HttpContext.Current.Session; }
    }
    public HttpServerUtility Server
    {
      get { return HttpContext.Current.Server; }
    }
  }
}
With this code in place, your custom module can look like this. Notice how it has direct access to the Request object, without the need to access HttpContext.Current any more:
[AddInName("DvkArticles")]
public class Frontend : CustomModuleBase
{
  public override string GetContent()
  {
    if (Base.ChkInteger(Request.QueryString.Get("ArticleId")) == 0)
    {
      ...
    }
  }
}
NOTE: Remember: you are now directly accessing ASP.NET's QueryString collection and thus you're skipping the SQL Injection attack validation code. Make sure you sanitize any user input that you intend to send to the database in a SQL statement yourself. Alternatively, keep using Dynamicweb's Base.Request to be safe.
NOTE: In a future update of Dynamicweb, these properties will be added to the ContentModule class, removing the need to add them to your own base class. However, the concept of the base class remains. It's easy to add to your project right from the start, and add shared behavior to it whenever it makes sense.
NOTE: For the release targeted for the end of 2010, a major namespace update is planned, so Base.Request is likely to find a new home and name.
Keep these tips in mind the next time you create a custom module. They'll make developing modules a lot easier.
In the next few articles in this series I'll show you how to work with the Ribbon interface and other new UI elements.
Downloads
With each article, I'll make a download available with the module I've built so far. Additionally, you can download the full running demo with all changes up to the latest part in the series. The first download always shows the code from the article you're reading, while the second download is the full example and may contain code that is added or changed in later parts of the series.


