
Extending the Google Sitemap Feature with Custom Content
Recent versions of Dynamicweb have made it easy to publish a Google Sitemap file as /sitemap.xml on your domain. The standard behavior of this feature is to generate items for all publicly available URLs in your menu structure. With a bit of custom development, it's easy to add your own items to the sitemap file which may come in handy if you want to expose content from a Custom Module through the Google sitemap. And with some XSLT it's pretty easy to extend the output file with a few more attributes supported by the Google sitemap format.
Introduction
You can let Dynamicweb generate a Google sitemap automatically if you have the Search Engine Optimization module installed. Enabling the Google sitemap is pretty easy:
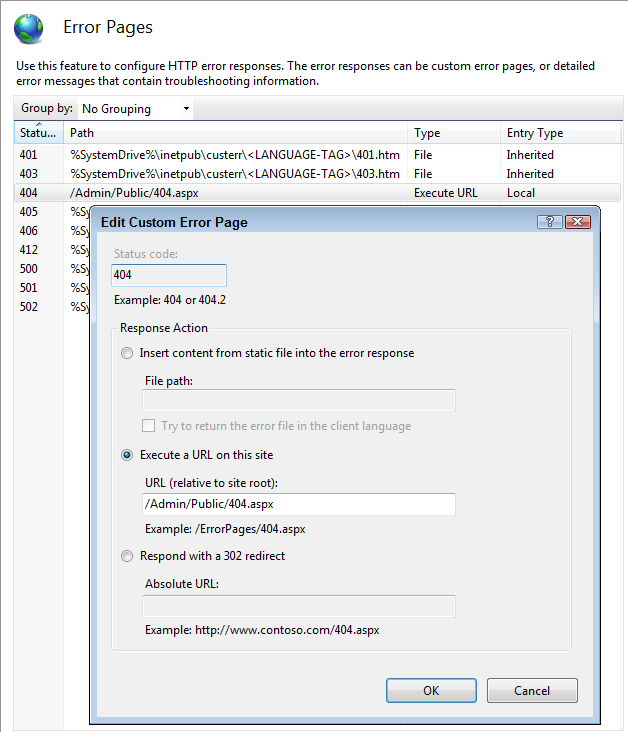
- Ensure that 404 errors are mapped to Dynamicweb. In order to do this, locate your site in IIS 7, open the Error Pages item and set the 404 error to /Admin/Public/404.aspx as shown in Figure 1.
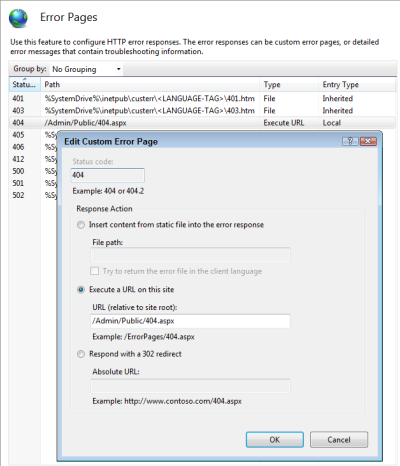
Figure 1 (click to enlarge) - Next, in the Actions panel for the Error Pages item on the right click Edit Feature settings and make sure that Custom Error Pages is selected as shown in Figure 2.
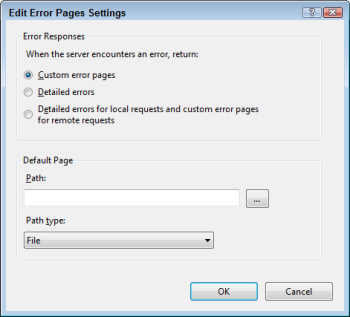
Figure 2 (click to enlarge)For versions of IIS before version 7, check out Appendix D - Custom Error Pages from the Installation Guide ((en-US) Installation Guide, Dynamicweb 7 on IIS 5-6).
- To tell Dynamicweb to include a link to the sitemap in Robots.txt, log in to your Dynamicweb administration. If you have the Websites module installed, choose Modules | Websites and click the web site for which you want to set the Google sitemap. If you don't have the Websites module installed, choose Modules | Frontpage instead.
- In both cases, click the Robots.txt item and place a checkmark in the checkbox for "Link to Google Sitemap" as shown in Figure 3:
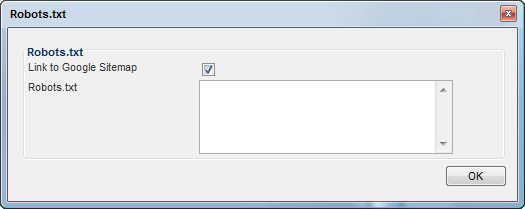
Figure 3 If you don't see this item, ensure that the Search Engine Optimization module is installed.
- Click OK to apply the changes and then click Save and close to close the Website dialog.

To test out the sitemap, request the page /sitemap.xml on your domain. In my case, I used http://devierkoeden.com/sitemap.xml. You should see XML similar to that shown in Figure 4:
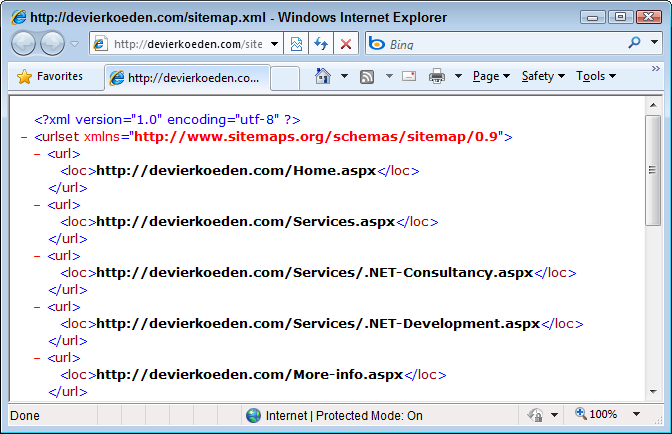
Figure
4 (click to enlarge)
If you get an IIS error instead, ensure that you correctly set up the 404 error page in IIS as explained earlier.
Adding Your Own Items to the Google Sitemap
As you can see in Figure 4, the sitemap contains standard pages from the Dynamicweb menu structure. If your site has a custom module with custom content (such as my Articles series) you won't see any of your custom content, except for the wrapping page that contains your module. Fortunately, it's pretty easy to add your own items to the sitemap. The trick is to use a MenuProvider to add the items to the output, but only for requests to the sitemap.xml file as otherwise your items will show up in your standard navigation menus as well. To implement the MenuProvider, follow these steps:
- Add a new class file to your Custom Modules project. If you're new to custom modules, be sure to check out the article Custom Modules - Part 1 - Introduction and other parts in the series first.
- Add the following class code to the file:
- Inside the overriden ProcessTree method you can add your own items to the standard navigation structure. For other extensibility scenarios, such as adding your items to the main menu for normal requests, you could loop through the collection of nodes exposed by the rootNode parameter to find the right item. However, since the Google sitemap is just a flat list of XML nodes, you can add items to the rootNode directly. The following example shows how this works:
public override void ProcessTree(RootNavigationItem rootNode, XMLNavigation.NavigationType navigationType) { HttpRequest request = HttpContext.Current.Request; if (request.RawUrl.ToLower().Contains("/sitemap.xml")) { for (int i = 0; i < 5; i++) { PageNavigationItem menuItem = new PageNavigationItem { FriendlyHref = String.Format("http://{0}/SomePath/{1}", request.Url.Host, i), }; rootNode.AddChild(menuItem); } } }Here I am just simply looping from 0 to 4 and add an item to the list. In a real-world application, this code would most likely access the API used by your custom module and get data from a database or XML file. Note how the item that is added is a PageNavigationItem item, the main class used to add page links to the menu. Also note how this code only fires when a request for /sitemap.xml is made, skipping the creation of nodes for all other requests in the site. I use RawUrl.Contains rather than checking the actual file name directly as sometimes the path sitemap.xml may be hidden in the query string for the 404 page. By using Contains, you can catch those cases as well as direct requests for /sitemap.xml.
To output Search Engine Friendly URLs to your content in the sitemap file, you can use the static getSearchFriendlyUrl method of the SearchEngineFriendlyURLs class like this:string url = SearchEngineFriendlyURLs.getSearchFriendlyUrl( "Default.aspx?ID=15&SomeParam=SomeValue", "Custom Text Here");When you use this code you need to make sure that ID=15 points to an existing page in your site. You can hard code the value if you're sure it won't change, or make this use configurable somehow. To create links to content in my custom articles module on this web site, I use this code:
which results in a URL like this:string pageLink = string.Format("default.aspx?Id=41&articleId={0}", article.Id);
string url = SearchEngineFriendlyURLs.getSearchFriendlyUrl(pageLink, article.Title);
Combined with http:// and Request.Url.Host, this results in the complete and search engine friendly URL of the article being inserted in the site map./Articles/[articleId/9]/Assigning-a-Custom-404-Page-to-Each-Web-Site.aspx
Note: the overload of the getSearchFriendlyUrl method that accepts the URL and the custom text was only recently added to Dynamicweb. It should be available with the next service release, but it may not be available yet with the version you are working with. Check the Engage web site for the most recent version, later than 19.1.0.3.
- When you now request the sitemap URL in your browser, you should something like the following:
<?xml version="1.0" encoding="utf-8"?> <urlset xmlns="http://www.sitemaps.org/schemas/sitemap/0.9"> <url> <loc>http://devierkoeden.com/Home.aspx</loc> </url> ... <url> <loc>http://devierkoeden.com/SomePath/0</loc> </url> <url> <loc>http://devierkoeden.com/SomePath/1</loc> </url> <url> <loc>http://devierkoeden.com/SomePath/2</loc> </url> <url> <loc>http://devierkoeden.com/SomePath/3</loc> </url> <url> <loc>http://devierkoeden.com/SomePath/4</loc> </url> </urlset>
using System;
using System.Web;
using Dynamicweb.Extensibility;
using Dynamicweb.Frontend;
using Dynamicweb.Frontend.NavigationProviders;
namespace DeVierKoeden.Dynamicweb.Samples
{
  [AddInOrder(-1)]
  public class MenuProvider : NavigationProvider
  {
    public override void ProcessTree(RootNavigationItem rootNode,
                        XMLNavigation.NavigationType navigationType)
    {
    }
  }
}
When Google requests your sitemap, Dynamicweb fires the ProcessTree method of your MenuProvider class that it picked up automatically from your custom module's assembly using reflection. That method then adds the additional items to the tree which get rendered to the final XML. Google then finds and processes the custom module URLs which in turn makes them easier to index and track.
Extending the Sitemap Output
If you're familiar with the Google sitemap format, you'll know that the format supports other attributes such as <lastmod> and <changefreq>. The default Dynamicweb site map doesn't output these items, but it's easy to add them for your own custom content. Here's how to do that:
- In your Custom Module project add a new class file and call it GoogleSitemapMenuItem and let it inherit from MenuItem (the PageNavigationItem class you saw earlier inherits MenuItem as well). For each additional XML node you want to support, add an automatic property. Give each property an AddInName attribute with the name of the property. This name will end up as an attribute in the menu XML which can later be accessed from within the XSLT file for the sitemap. In my example, I want to support the lastmod and changefreq items so my class looks like this:
public class GoogleSitemapMenuItem : NavigationItem { [AddInName("ChangeFrequency")] public string ChangeFrequency{ get; set; }
[AddInName("LastModified")] public string LastModified{ get; set; } } -
Next, modify the ProcessTree method and add items of type
GoogleSitemapMenuItem instead of PageNavigationItem. Additionally, set the ChangeFrequency and LastModified properties as you see fit. In my example, I have code similar to this:
I am just hardcoding values but again, in your custom modules, you typically get these values from objects or database records you want to expose through the sitemap. The method ToW3C is an extension method that returns the date and time in a format supported by the Google sitemap. The method is very simple and looks like this:for (int i = 0; i < 5; i++) { GoogleSitemapMenuItem menuItem = new GoogleSitemapMenuItem { FriendlyHref = String.Format("http://{0}/SomePath/{1}", request.Url.Host, i), ChangeFrequency = "Weekly", LastModified = DateTime.Now.ToW3CDate() }; rootNode.AddChild(menuItem); }
public static class Extensions { public static string ToW3CDate(this DateTime datetime) { return datetime.ToUniversalTime().ToString("s") + "Z"; } } - The final step in the process is to modify the XSLT template used to output the sitemap code. By default an xslt file located at /Admin/Public/SEOSitemap.xslt is used. This file contains the XSLT that is used to create the Google sitemap. Modifying this file means that all sites on the server using the same Dynamicweb installation will be affected. It also means it will be overwritten the next time you update Dynamicweb, so this is probably not the file you want to use. Fortunately, in an upcoming release, a new feature will be made available that enables you to place an XSLT file called SEOSitemap.xslt in the System folder of your web site, giving you the chance to make changes on a site by site basis, and avod the risk of the file getting overwritten on the next update of Dynamicweb. To add the extra nodes, make the following changes to one of the two XSLT files:
Most of this code comes from the standard XSLT file, except for the two additional nodes: changefreq and lastmod. I wrapped them in an xsl:if test to avoid the items being added for standard Dynamicweb links that don't have these attributes available.<xsl:template match="//Page"> <xsl:element name="url" xmlns="http://www.sitemaps.org/schemas/sitemap/0.9" > <loc> <xsl:value-of select="@FriendlyHref" disable-output-escaping="yes"/> </loc> <xsl:if test="@ChangeFrequency != ''"> <changefreq> <xsl:value-of select="@ChangeFrequency" disable-output-escaping="yes"/> </changefreq> </xsl:if> <xsl:if test="@LastModified != ''"> <lastmod> <xsl:value-of select="@LastModified" disable-output-escaping="yes"/> </lastmod> </xsl:if> </xsl:element> </xsl:template>
When the sitemap is now requested, the custom nodes will end up like this:
<url>
  <loc>http://devierkoeden.com/SomePath/4</loc>
  <changefreq>Weekly</changefreq>
  <lastmod>2010-06-26T14:20:23Z</lastmod>
</url>
Wrapping Up
By extending the menu using a MenuProvider you can add additional elements to Dynamicweb's navigation structure. In this article, I used a MenuProvider that specifically processes requests for sitemap.xml only, but in other situations it's just as easy to add your own items to the navigation structure used to render standard menus and Dynamicweb sitemaps. By adding your own items to the sitemap file you increase the chances of the files getting indexed by Google as soon as possible. It also gives you an opportunity to add files to the list that may not be accessible directly.
When using this solution make sure you use the SEOSitemap.xslt file saved in your System folder. If you use the built-in file from the /Admin folder, you run the risk of overwriting the file when a new Dynamicweb version comes out.
Downloads
Download the code for the MenuProvider, menuItem, extension method and XSLT template