
Introducing the Quick Dynamicweb Installer
NOTE: the concepts presented in this article are now considered obsolete possibly because better alternatives are available.
Did you ever wish that that installing Dynamicweb on your development box was easier and quicker? It is now!
Introduction
If you're a developer building sites with Dynamicweb, or maybe even a sales representative doing Dynamicweb demos, you may have the need to quickly set up a new Dynamicweb installation. You may want to try out a bug fix in the latest hot fix made available at the Developer portal, or you may need a clean setup of the Industry Solutions for a consultative selling session at a customer. The typical steps you go through may look similar to this:
- Find and download the latest version of Dynamicweb on the Developer portal.
- Extract the application to disk so it can be used as an application or virtual directory in IIS.
- Find, download and extract the latest version of the DefaultEmptyData or the Industry Solutions file set.
- Set up a new site in IIS and configure virtual directories like /Files and /Admin.
- Restore the SQL Server backup file into SQL server.
- Configure permissions in SQL Server (create a login, a user, and associate it with roles).
- Configure the GlobalSettings.aspx file in Dynamicweb to point to the correct SQL Server instance.
- Update the password for the administrator account in the database used to log in.
- Start your browser, navigate to your site's Admin folder and log in.
While none of this is extremely complicated (I wrote about this in detail in the series Building Custom modules), it gets boring after a while and takes more time than it should, especially when you're setting up "one off" webs sites that you only use for a couple of hours.
To overcome this problem, I created the Quick Dynamicweb Installer application, a simple but effective tool to quickly set up new Dynamicweb websites on developer machines.
Note: while you could use this tool to create new sites on production servers as well, I recommend against it for now. Production sites have a much longer life span so the time you need to spend to set it up is only a fraction of the lifetime of the site. In addition, for a production site you may want to make other configuration changes when it comes to security and performance, so you probably want to give this more thought and make it a manual process.
Feature Overview
The Quick Dynamicweb Installer is a simple .NET Win Forms application that looks like this when you start it up first:
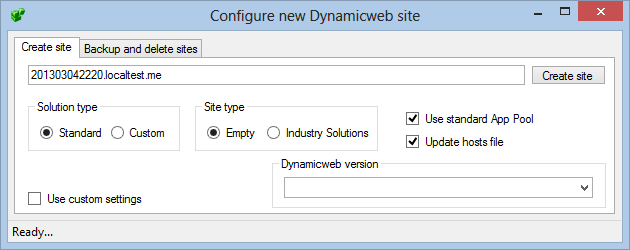
Figure 1
To use the tool, you make up a new domain name (for convenience, use one that ends on localtest.me; see here for an explanation of this domain and why it is so useful). Next, you choose between a Standard and Custom solution (this determines the root of the site in IIS and whether or not /Admin is virtually included). You then choose between an empty database (using DefaultEmptyData8Sql.zip) and the Industry Solutions data set. You then pick a Dynamicweb version from the Version drop-down list (which is built from a folder containing ZIP files with Dynamicweb applications), make some optional changes to the application pool and hosts file, hit Create site and less than a minute later you have a complete Dynamicweb site up and running.
The tool supports the following features:
- It enables you to choose between standard solutions and custom solutions. In the latter case, you need to manually add your own Visual Studio project using the DW templates for Visual Studio to the Application folder.
- You can choose between DefaultEmptyData and the Industry Solutions data set.
- It automatically creates the web site in IIS, adds an application pool if necessary, and adds /Files and /Admin virtual directories.
- When "Use standard app pool" is checked, it tries to use an application pool called Dynamicweb 8 Sites. It creates the pool when it doesn't exist. When this checkbox is off, it always creates a new application pool named after the site.
- It restores the SQL Server database from a ZIP file against a configurable SQL Server instance and sets up logins, users and permissions in SQL Server.
- It has support for "post installation SQL fixes" to run custom SQL scripts to make changes to the database after the site has been set up. This enables you to fix issues in the database as is currently the case with the domain names on the current industry solutions site.
- It uses a (configurable) folder with Dynamicweb applications in the ZIP format as they come from the Developer portal. That means you can drop a ZIP file in the Zips folder and the Dynamicweb version drop down is populated automatically. It then sees if an unzipped version of the selected application already exists and extracts the files if necessary.
- It uses zipped versions of the DefaultEmptyData and Industry Solutions starting data sets; his means you can just drop a new ZIP file in a (configurable) folder and it just works.
- It has a configuration file that enables you to specify the location of the input and output folders so you can freely determine the location of your files.
Best of all, it's released as open source and comes with a relaxed license code so you can pretty use the code the way you like.
System Requirements
In order to use this tool, your system must meet the following system requirements:
- Running on Windows 7 or 8 or the associated server editions.
- SQL Server 2008 R2 or later (as the Industry Solutions database is built on 2008 R2).
- The .NET 4.5 framework must be installed.
- For machines you want to compile the source code on, you need to have a copy of Visual Studio 2012. The Express version for C# should work, although it hasn't been tested at this stage.
Getting Started
In order to get started with the Quick Dynamicweb installer, follow these instructions:
- Download the latest source or stable release from the CodePlex website. You find the project here: https://dwinstaller.codeplex.com/. Switch to the Downloads tab and download the latest release. Alternatively, you can grab a copy of the latest source at the Source Code tab.
- Extract the source to disk and then open Visual Studio 2012 running as an Administrator. You need VS 2012 / .NET 4.5 because of the ZIP Manager API the tool uses which was introduced in .NET 4.5). You need to run as an administrator because the tool requires administrative permissions to setup IIS and execute other tasks.
- Open the project in Visual Studio.
- Next, you need to configure and setup the application. This comes down to creating a bunch of folders on your local hard drive and making changes to the application's configuration file. Each of the folders you need to create is configurable in the application's app.config file, but I'll be using the default folder names in this walkthrough. Feel free to change the folders used in the configuration file to match your own preferences. Start by creating a new folder called C:\Dynamicweb on your local hard drive.
- Add the following sub folders to C:\Dynamicweb:
|
Applications |
This folder will contain the extracted Dynamicweb applications. |
|
DynamicwebDatabases |
This folder contains the MDF and LDF SQL Server database files used by the applications you install. I find it convenient to store the Dynamicweb databases in a separate folder. If you prefer them in the standard SQL Server folder, simply specify the full to the SQL Server Data folder in the SqlDataFolder appSetting in app.config. |
|
Install |
This folder contains the DefaultEmptyData8SQL and solution set data files. |
|
Sites |
This folder contains the sites you create with this tool. |
|
Zips |
This folder contains the Dynamicweb application ZIP files you can download from the developer portal. |
You should end up with a folder structure like this:
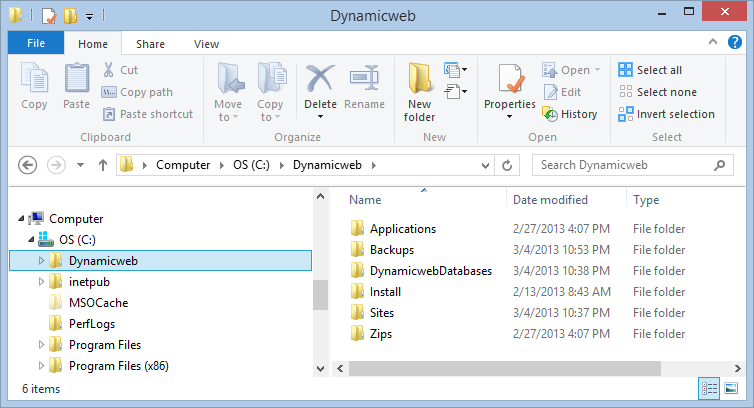
Figure 2
- Next, download the Applications you need from the developer portal. I would recommend to get at least the latest version, and one older version so you can see how the tool behaves with multiple versions of Dynamicweb. Store the ZIP files in the folder C:\Dynamicweb\Zips. There's no need to extract their contents.
- From the Dynamicweb Developer portal download DefaultEmptyData8SQL.zip (the standard file set for an empty database) and Solutionset.zip (the complete solution set) and save them in C:\Dynamicweb\Install. Again, there is no need to extract their contents.
- With the Quick Dynamicweb Installer project open in Visual Studio, open app.config and make any changes you need to match your system and setup. The following table shows all configuration options and explains why you may want to change them.
|
AppCmdLocation |
This is the path to the Windows / IIS appcmd.exe tool used to create the site and related data in IIS. |
|
StandardAppFolder |
This is where the Dynamicweb applications are extracted to. |
|
ApplicationZipsFolder |
This is where the installer tool expects to find the zipped Dynamicweb applications downloaded from the developer portal. |
|
DefaultDomain |
This is the default domain name suffix used for the new site's name and host header. |
|
TargetFolder |
This is where your new sites are created. Each site will have a folder named after the domain name you specify when creating the site. |
|
DefaultEmptyDataFile |
This is the path to the DefaultEmptyData8SQL.zip file for new, blank sites. |
|
IndustrySolutionsDataFile |
This is the path to the Solutionset.zip file for sites based on the Industry Solutions site. |
|
SqlServerInstance |
The instance of SQL Server used by the new site. This must be SQL Server 2008 R2 or later to support the Industry Solutions. |
|
SqlDataFolder |
This is the folder where the SQL Server MDF files are created. |
|
HostsFile |
This is the location for your Windows hosts file. This file is updated with a mapping between the site's domain name and 127.0.0.1 so you can access the site even when you're offline. |
|
DefaultAdminPassword |
This is the default password for the Administrator account you can use to log in to the site. |
|
PostInstallSqlFixesFile |
A SQL file with custom SQL statements you want to execute against the database after the site has been created. Leave the path empty if you don't want to execute any custom code. |
|
PostInstallSqlFixesIndustrySolutionsFile |
A SQL file with custom SQL statements you want to execute against the Industry Solutions database. With this first release, this file contains some SQL statements to get rid of the default domain names associated with the sites as they only work within Dynamicweb's network. This path depends on the location where you extracted the source file, so be sure to update it before you run the application. |
- Next, hit F5 to start the application. If you weren't running Visual Studio as an Administrator you're prompted to restart, as the tool can only be run within an administrative context. You should see the following screen:
Figure 3 - As a convenience, a new name for the application has been generated containing the current date and time. You can overwrite the selection with a new name and leave the default domain name suffix in place or you can enter an entirely new name. If you leave the Update hosts file option checked, you can pretty much make up any name that is valid as a domain name, as it will be written to the Windows hosts file and associated with the local machine.
- Next, choose between a new, empty site and the Industry Solutions set in the Solution type area. In the former case, the new site is based on the Default Empty Data set for Dynamicweb 8. In the latter case, the site is a copy of the Dynamicweb Industry Solutions set.
- Next, choose between a Standard and a Custom solution in the Site type area. In the latter case your site won't run immediately as you'll manually need to create a Dynamicweb Visual Studio in the application's folder. Check out this series on building custom modules for more details.
- You can leave Use standard App Pool checked if you want the tool to try and use an application pool called Dynamicweb 8 Sites. This application pool will be created the first time if it doesn't exist. I prefer this solution so all my Dynamicweb sites use the same application pool which in turn means less memory overhead and a less cluttered application pool list. Uncheck this option if you require process isolation and want the site to use its own application pool. In that case, a new application pool is created named after the new site you're creating.
- From the Dynamicweb version drop-down choose the Dynamicweb version you want to use. It should list all applications that the tool found in the ApplicationZipsFolder application setting. If the drop down is empty, make sure you created the folder and copied your Dynamicweb applications (as ZIP files) into this folder.
- Finally, click Create site to create a new site, copy the required files, setup a SQL Server database, configure Dynamicweb and start up your browser. After a short delay, your default browser should start up and you should be able to log in using the password specified in the application's configuration file (which defaults to admin).
That's it. You just created a new Dynamicweb site using this handy installer.
The code is documented and much of it is pretty straight forward so I won't describe how the tool works in full detail but to give you a rough idea what it does, here's a quick rundown of the steps it carries out:
- When you click the Create site button, a new instance of SiteGenerator is created and its CreateSite method is called.
- This method calls SetupSettings which retrieves all settings from the Form and stores them in an instance of the InstallSettings class. This method performs some logic to determine the type of site that needs to be created, setups database names and backup paths, and extracts the files from the application and data set zip files to their target locations.
- Then a new IIS site is created using the managed ServerManager class.
- Then the following IIS related actions are carried out:
- The bindings are set up (associating the site with the selected domain name)
- A virtual directory for /Files is created.
- When setting up a custom site, a virtual directory for /Admin is created that points to the Admin folder of the selected application.
- An application pool is created when the default application pool (called Dynamicweb 8 sites) does not exist or you chose to use a custom application pool.
- A 404 handler for the site is registered with IIS.
- The tool then creates a new SQL Server database against the configured instance and restores a backup of the selected database into this new database.
- The tool then creates a new login at the SQL Server level (if it didn't exist yet), creates a new user in the database for this login and assigns it to the minimum required SQL roles. It then performs some cleanup by deleting users that come with the backup file but that you don't need. The final database related steps are resetting the Administrator password to the one you specified in the application's configuration file and running the custom "fix up" SQL statement to get the database in the shape you want it.
- The tool then writes to the site's GlobalSettings.aspx file to register the SQL server instance and database name and writes the domain name to the Windows hosts file to associate it with 127.0.0.
- The final steps include deleting the SQL Server .bak file and starting up your default browser so you can login.
Known Issues
- The tool currently only supports Integrated Windows Authentication. You'll need to change the code or update the site and database afterwards if you want to support SQL Server Authentication instead. If there's a demand for this integration method, let me know (just open a new issue using the Issue Tracker at https://dwinstaller.codeplex.com/workitem/list/basic). Better yet: update the code yourself and send me a pull request on the CodePlex site.
- The tool currently only creates new sites, but doesn't support deleting existing sites. This is not hard to add so let me know if you have a need for this using the Issue Tracker.
- It doesn't support restoring sites from a custom ZIP file. This could be useful if you have a ZIP file containing a Files folder, and/or an Application folder and/or a custom SQL Server backup file from an existing website. Again, let me know if you would like to have this feature using the Issue Tracker at the CodePlex site.
Next Steps
The next steps largely depend on you: the user of this tool. Please let me know if you find it useful, and whether you have any change requests that would improve it. You can submit requests using the Issue Tracker at the tool's page on CodePlex.com. If you've written code to fix a bug or add additional functionality, you can send me a pull request using the Upload Patch functionality on the Source Code tab. If you want to contribute more to this project than a one-off patch, let me know and I'll make you a contributor to the project.
Happy to hear your thoughts on this little tool; good or bad. You can contact me through my contact page.